Friday, March 5, 2010

It will by now be obvious that I've caught the classic folder collecting, repairing, and occasionally using bug, and on the July 12-13 weekend of 2008 I decided it was time to put several of them through their paces. The occasion was an airshow in Geneseo, in upstate New York, at which vintage aircraft are presented in more picturesque surroundings than your typical urban airport. I took with me 6 or 7 folders, an RB67, a couple of Contax 35mm SLRs and some digital junk. My intention was to try out 3 or 4 of the folders on Saturday and another 3 or 4 on Sunday, but the show was rained out Sunday so I was only able to give 3 of the folders a good workout.

This is meant to be a "road test" thread to describe how the cameras handled and what the results were like.

The photo below shows the three folders I tested. From left to right, they are a Zeiss-Ikon Ikonta 521/16 (6x6) with a 75mm f/3.5 Novar, a Zeiss-Ikon Nettar 515/2 (6x9) with a 105mm f/6.3 Novar, and a Zeiss-Ikon Nettar 515 (6x4.5) with a 75mm f4.5 Novar. All had the flip-up type finder on the body, no rangefinder, and no exposure meter. Each was purchased on the auction site for under $40 and is routinely available in this condition for that price. I did a basic CLA of the shutters and some minor repairs to get them in working trim.

I intended to shoot color positive film exclusively and brought along a supply of Astia 100F, Provia 100F, and Velvia 100. Shooting slide film with old folders is tricky because it is so unforgiving of exposure errors, but it's what I like and I have worked out a method to get decent results. The first important thing is to know what shutter speed you are shooting at. Even after they have been CLAd by the experts, folder shutter speeds are not accurate in the sense of matching up with the indicated speed on the dial. But they are reliable in the sense that you do get the same (inaccurate) shutter speed very repeatably. I made one of those DIY shutter speed testers that works with your PC's sound card for testing the shutters. At first I took the average of five trials at each indicated speed to determine the actual shutter speed, but soon I realized that three trials was plenty and really even one or two would be enough. For each camera, I measured the actual shutter speed for each indicated speed. Then, by moving the dial to intermediate positions (e.g. halfway between '25' and '50'), I tried to see how close I could come to the standard shutter speeds of 1/30, 1/60, 1/125, and (if the camera was capable of it) 1/250. Then I made up a little card for each camera like this:

I keep that in my breast pocket when I'm shooting. Note on this card, typically of many folders, that while all but the top speeds may lag, the very top speed is often close to or even faster than the rated speed. The reason for that is that on these old shutters, the top speed actually bypasses the geared escapement that times the other speeds, simply springing closed as fast as it can. So if the gears have picked up a little extra resistance over the years, it won't affect the top speed.

Often, the nature of the speed cams inside these shutters, which tend to increase in discrete steps, makes it impossible to get very close to a desired speed such as 1/60. In such cases you have to get as close as you can and live with it. To simplify things, I tend to settle on a speed that works well for a camera, say 1/125, and shoot at that all day, to the extent I can, varying the aperture rather than the shutter speed.

Besides knowing your shutter speed, the other good rule for slide shooting with folders is to meter accurately, using something like an SLR. Pulling out one of those old selenium meters may look very butch and old-school, but it introduces too much imprecision for slide shooting. Save it for when you're doing negs. Most of the time, I used my SLR for focusing as well, reading the distance off the SLR lens barrel and transferring it to the folder. My usual procedure was to meter and focus with the SLR, usually shoot an insurance shot with it, then transfer the settings to my folder and make the real shot.

I brought along my RB67 to serve as a benchmark for the folders. This of course is a classic in its own right, especially my old Pro model.

With the RB67 you get that wonderful Mamiya glass with all that contrast, sharpness and tonality, it's just an amazing camera. I knew the folders weren't going to be THAT good. But, dollar for dollar and ounce for pound, could they hold their own at least a little?

First up was the 6x9 Nettar 515/2. With its slow 6.3 lens, this is about the lowest-end folder that I have (unless you count my Kodak Tourist II which lacks such refinements as the ability to focus), and I have better 6x9s but I wanted to see what this very basic camera could do. These were the first rolls of film I ever ran through it. I used a tripod and cable release for all shots with this camera because of the big image size and slightly awkward handling. As with all of the folders, I tried and was generally successful at staying in the lens's sweet spot of f/8 to f/16.

This camera produces large, eye-popping transparencies. There is just nothing like the wow factor of 6x9. On closer inspection, the images were surprisingly good. (I'm showing all of the folder photos with borders so you can see the variations in how straight and clean the image edges are.)

Sharpness of the slides viewed through a loupe was quite nice. Small stencilling painted in 1-inch-high letters on the sides of 30-foot-long aircraft were easily legible, even when the whole aircraft was in the frame. In the biplane picture above, there are some college buildings on a hillside in the background about 2 miles away, and with a loupe, you can make out the individual panes in their windows. So that little Novar doesn't give away much to the RB67 in sharpness!

(By the way, all of these MF scans are from my crappy Epson 4180 Photo scanner, and are retouched by me to look reasonably like the original slides. The scan itself tells you nothing about what the film looks like, I'm just using them for illustration.)

The Novar also had no problem producing accurate and pleasing color rendition. I did not use a lens hood with any of the cameras, but had no flare problems.

The problem that I did have, as you can see in all of these scans, was brightness fall-off from center to edge. I don't think "vignetting" is the right word for this, it's just -- fall-off. In the transparencies themselves it is not very noticeable, but it is definitely there. Scans seem to accentuate this problem, as I have also noticed with scans of my 35mm film shot with cheaper lenses. The amount of it that is present with this camera can be eliminated almost without artifacts by any of the common PS plugins, but still, it is disappointing.

My next folder was the 6x6 Ikonta 521/16. This was an easy-handling camera with the welcome feature of multiple exposure prevention. On cameras without this feature you can try to avoid multiple exposures by establishing a routine where, for example, winding the film is always the last thing you do before you shoot, but then there are always times where your picture goes away at the last moment, you give up and walk around some more, then you can't remember whether you wound or not. I erred on the conversative side and always wound again when I wasn't sure, and ended up with no double exposures but a few mixed frames. Except with the Ikonta. That was nice.

Photos with the Ikonta were also very nice and sharp. I was pleased with both the resolution and contrast that I was able to get.

Exposures and focus were accurate. Composing the picture through the flip-up viewfinder, however, was tricky. A few, but not all, of my photos have more sky at the top and less earth at the bottom than I remember composing.

I used this camera on a tripod sometimes and handheld other times, and generally, the ones I took on a tripod seemed to come out more accurately composed. So maybe the trick to using these flippy finders is just taking your time and making sure your face is square with the camera.

This is my first 6x6 camera, and about the third roll of film I've put through it. I enjoy the challenge of the square composition. Airplanes are inherently horizontal subjects, so the square encourages you to find an interesting composition in part of the airplane. I enjoy that.

Note, though, the issue with the frame edges with the Ikonta. The sides cant inwards at the top of the frame (and also less noticeably at the bottom). The edges toward those corners are fuzzy. Maybe the bellows are intruding into the frame a bit? And the other issue is that there is a darkening in the corners -- and this I would really call vignetting, in contrast to what happened with the 515/2. Also, unlike the 515/2's brightness fall-off issues, which occurred at all apertures, the vignetting with the Ikonta seemed to go away as the lens was stopped down.

The solution to this, I guess, is to compose the picture conservatively, allowing a margin around the edge that can be cropped off. There's still plenty of real estate on the neg/slide to play with.

The third and final camera for this jaunt was the Nettar 515, truly a delightful little camera with a 6x4.5 image size. It is more compact than any high-end SLR, and so easy to handle that it just begs to be treated like a 35mm camera, especially with 16 frames per roll to play with. So, that was what I did.

I didn't get this camera on the tripod at all. It would have been awkward anyway, since the photo format is vertical when the camera is right-side-up, and it doesn't go on a tripod easily when held sideways. But mainly it was just too much fun.

Essentially I treated this camera like a super 35mm, using it whenever I would have used my 35mm but found a shot that would benefit from just a little more resolution. Actually, I had never shot 6x4.5 before and was surprised at the amount of extra punch you get compared with 35mm.

Once again, the Novar lens proved more than capable of handling color, controlling flare, and making Velvia look like Velvia. Also, this camera displayed nice clean, straight edges and no vignetting or light fall-off.

One thing about this camera, though, was that composing through the flippy finder was dodgy. I found that the actual image area captured was rather smaller than what I had seen through the finder, and also biased a bit to the left. As a result, the left edge of some of my subjects was snipped off, or nearly so.

This made me think that with cameras with flippy finders, it is a good idea to calibrate the finder somehow. Maybe in much the same manner as calibrating the focusing element, put magic tape or a groundglass at the film plane, hold the shutter open and compare the image through the finder with that through the lens.

Or another answer is simply, again, to compose conservatively and leave a little margin around the edges, recognizing that the flippy finders are just not very precise. At any rate, this is a small quibble. It created issues for only a few images. Overall, I was more pleased with this camera than with either of the other two, and it is so handy that I will be carrying it with me often.


So that is an account of shooting slides with the old folders. Perhaps not adequately stressed in this road test is how darned much fun it is walking around with a bag full of these things and snapping away. It would almost be worthwhile even if the film didn't come out. Except it's expensive, so I'm glad it did.

Thursday, March 4, 2010

Yashicaflex


Not long ago I acquired a Yashicaflex twin-lens reflex (TLR) camera. Yashica has a long history of making pretty fair TLRs but this is one of the first, dating from about 1955, and a fairly rare model. It is only my second TLR, and about 20 years younger than my first one. I decided it was time to invest in more up-to-date technology.

The lens of this camera is a coated 80mm f3.5 Yashimar, a three-element lens that serious collectors and photographers turn up their noses at. That's fine with me, especially if they leave room for me to sneak under their noses and buy a camera like this for about $30.

This was in pretty nice shape, fully functional and with its only cosmetic defect being a missing center cover to the focusing knob, which was easily replaced.

Peering inside the Yashimar, I could see some slightly worrisome bits of crud between the elements. Also, on testing, the shutter proved slow, barely getting up to 1/60 rather than its rated top speed of 1/200 sec. After 55 years, a bit of maintenance was in order.


This was one of the easiest cameras I've ever worked on. The front lens elements unscrew like a jar top, then there's a simple retaining ring, and you're into the Copal shutter, which is very simple and straightforward.

With lighter fuel, cotton swabs and some patience, I soon had the lens and shutter blades looking pristine. Shutter speeds never quite got back up where I wanted them, topping out at about 1/100. The original rated 1/200 was probably pretty aspirational anyway.

For my test roll of film, I carefully considered the time of year, the pictures I wanted to take, the lighting I was likely to encounter, and the artistic expression that I was going for. Then I chose a roll of Ilford FP4+ because it was the most time-expired film in my closet.


I carried the camera around for about a week. It was handy and easy to carry. The main ergonomic fault is that the shutter cocking lever is close to the release, and a couple of times my fingers interfered with it when tripping the shutter. Fortunately I realized that I had ruined the frame and immediately retook the pictures. After a while I started using a cable release even when hand holding this camera.


For the price, I was satisfied with the performance. The lens is contrasty and doesn't vignette. Viewed through a loupe, the negatives are maybe not quite as sharp as those taken with some of my better lenses. But to reiterate, it's a $30 camera and the 6x6cm negatives provide plenty of detail.


Tuesday, January 26, 2010

Some airplane shooting buffs lately have started hoisting their cameras up on tall poles to get a high angle on their subjects. This has a number of advantages when shooting planes on the ground. Small planes are considered to be flattered by an angle that shows the upper surface of the wing; you can sometimes hoist the camera high enough to shoot into cockpits; in museums, you can get above the clutter of guardrails and display cases; plus it just looks different.

With digital, especially if you have a remote or articulated live view screen, this is easy. I decided to see if it could be done with a real man's camera. The other constraint on my rig was that it must be very portable -- enough not to require any extra baggage when flying on business trips.

My chosen camera was an Exakta VX-IIa with waist level finder.


I figured that I could hoist the camera (prefocused) inverted on a lightweight tripod, compose by squinting overhead at the groundglass, and fire it using a long cable release. I obtained a cheap Sunpak tripod, $30 brand new from B&H, which has the useful property of collapsing small enough to fit in a standard small airline roller bag, and a 40-inch cable release. The first problem I encountered, fortunately during a trial run at home, was the discovery that the pan-tilt head that is permanently attached to the Sunpak will not invert. I therefore had to go to the hardware store and spend another $3.50 on a bracket and some nuts and bolts of the proper size to build a mount to hang the camera from the tripod head. That worked well enough. Here is a picture of the rig, "in the field" so to speak.


Problem number two surfaced only when I was prowling around Chino airport looking for targets for my first test of the system. When used with an auto lens having a pass-through shutter release, the Exakta requires the trigger pin from the cable release to stick out a very long way to trip the shutter -- longer than any cable release I own, including the 40-incher. I do have an old mechanical self-timer whose pin projects far enough, but was useless because of the Exakta's shutter position, which would have the timer project forward and appear in the frame. The only alternative was to use a non-auto lens with no pass-through release -- or, as I ended up doing, kluge this by mounting an auto lens not quite all the way while wrapping the pass-through arm in a rubber band to induce a stop-down mode. This worked but was not quite satisfactory. If you think it might be hard to compose through a 24x36mm groundglass that you are balancing on a pole 3 feet above your head, try doing it with the lens stopped down to f/11 or so. These shots were taken in that manner, at the Chino Airport in November and during my visit to Fantasy of Flight last weekend. Lens was a Vivitar T4 24/2.8; film was drugstore-brand Fuji 200 neg film and Velvia 100.

All in all, it was successful as a proof-of-concept trial. I spent some time trying to modify the cable release so that it will trigger an Exakta through the pass-through shutter release, but to no avail. Eventually I solved the problem by buying a Miranda Sensorex, which has interchangeable finders like the Exakta but no funky shutter release issues; also it's a more modern and reliable camera all around and its tripod socket is flush with the bottom, giving greater stability on the bracket. I'll practice more with this system over the next few months and maybe, when airshow season rolls around, I'll even consider heaving a 6x6 TLR up there.


Sunday, January 24, 2010

Learning to Love Leitzes

Recently I acquired my first two Leitz lenses for shooting on my Soviet-made, Leica-compatible rangefinders. An avowed bottom feeder, I never thought I would see this day. But falling prices on the global online bazaar have placed some of the uncoated prewar Leitz lenses well into budget territory, and those are what I acquired: the 135mm Hektor and 90mm Elmar, dated by serials to 1937 and 1938, respectively.

The Hektor cost me around $60 and was optically and mechanically fine, although the barrel shows plenty of use. The Elmar was represented as having "some specks between the elements as well as some fungus …" Whenever "some fungus" is mentioned in an item listing, especially as if it is an afterthought, it is safe to assume that the lens looks like a biology experiment, which explains how I got it for $35. By the time it arrived, I had downloaded many resources and prepared myself for a teardown and cleaning, but it turned out that the fungus was just a tiny bloom along the edge, not nearly enough to warrant the risk of a repair job.

There seem to be two schools of thought on lens fungus, what I call the contagion and environmental theories. The contagion theory holds that although conditions play a role, lens fungus is a special disease that is transmitted from lens to lens, like the flu. Believers in this theory are likely to immediately clean any fungus from a lens and then still keep it quarantined from their other lenses or, better yet, hurl it with all available strength into a quarry or large body of water and try to forget they ever touched it. The environmental theory posits that lens fungi are common, pervasive strains and their spores are already on every surface of every lens you own, just waiting for the right conditions to germinate and spread. Under that theory, there is no harm in keeping the infected lens around other lenses, no need to clean it unless there is so much fungus that it interferes noticeably with lens performance (which requires rather a lot of fungus), and a good chance that further growth can be arrested through proper lens storage. I subscribe to the environmental theory, which made my quite happy with my purchase.

I selected a Fed 3, my favorite of my Soviet rangefinders, to try out the lenses. The first issue was mounting. The Elmar was no problem; it has a collar-type focusing cam like any of the Industars. The Hektor, however, has a tongue-type focusing cam, designed to work with the roller-type followers used on Leica cameras, and as several sources on the web will explain to you, it tends to catch and snag on the shoe-type follower used on the Zorkis and Feds. Web sources differ on whether the Hektor can easily be made to work with a Fed or Zorki, but I decided to give it a try. Given the market price for Fed 3s, there is not much downside to experimenting with modifying the camera.

The basic problem with fitting a Hektor to a Fed/Zorki is not necessarily inherent to the tongue cam and shoe follower combination; it arises from the fact that the Leitz tongue cam is made out of very soft brass, and the Fed/Zorki follower shoes are made out of very hard metal, with an unnecessarily sharp point at the toe, that sticks out way farther than it needs to when no lens is mounted, with the result that the sharp hard point digs into the lens tongue and snags, rather than riding up on it as it should. It was immediately clear that this was happening with my lens and camera, and even a couple of gentle tests put a tiny nick in the soft brass. Rick Oleson has some tech notes that describe adding a spacer behind the mount backplate of a Zorki to prevent the follower from coming so far forward, but while a variant of this mod is possible on a Fed 3, it is not as easy because the Fed has no mount backplate in that position. I decided instead just to modify the shape of the Fed follower by grinding down the point at the toe. Using a small grinding bit in my Dremel tool, I was able to round and smooth the toe of the shoe until it rode easily over the brass tongue in the lens. None of this will affect the focus calibration as long as you don't touch the front edge of the follower, which contacts with the lens screw when the lens is mounted. For anyone trying this, I have three pieces of advice, (1) take your time and don't force the spinning tool against the shoe, just touch it lightly because the metal is really hard and you don't want it slipping off and hitting something else, (2) the grinding is most easily done with the shoe forced fully back, away from the mount, so that you don't nick the mount threads, and (3) it's a good idea to stuff a tissue or something inside the camera body to catch the tiny metal shavings that are going to end up in there. The whole process takes about half an hour.

I took the Fed with the Elmar, the Hektor, and an Industar I-16 L/D on a recent trip to Florida. These photos were taken at two locations, the Fantasy of Flight airplane collection at Polk City and the boardwalk along the ocean at Miami Beach. Film was the new Ektar, which I was trying for the first time. I used an Imarect as my viewfinder.

With these uncoated lenses a lens hood is a must, but the Leica slip-on hoods cost as much as the lenses did. I solved this problem through the camera collector's compulsion to try every cylindrical object he encounters on his old lenses to see if they're the right size to make a cap or shade. It turns out that the toilet tissue rolls in service in my household fit very nicely over the Elmar and Hektor lenses. When one of these had served its intended purpose I cut the cardboard tube to the appropriate length, padded the interior slightly for a snug fit over the lenses, and wrapped the works in electrical tape to give it that classy, not-a-toilet-paper-roll look. While using the hoods in sunny Florida I had no flare problems with either lens. Additional benefits of these hoods is that being flexible, they stand up to a good deal of abuse and they're also expendable, since everyone with a butt needs to buy the main component and the rest of the investment is just five minutes and a little tape.
As for the lenses, well, they do their thing. They focus properly and they're sharp. Leica glow? I don't know. Maybe I'll have some when the fungus grows a little more. They get attention, too. There are a lot of retired folks in Miami, including at least one retired photographer who accosted and interrogated me about my equipment and shared his memories of his old Leica gear which, of course, he had unloaded for next to nothing on ebay.

The Miami Beach boardwalk is fascinating, especially the older hotels that were once luxurious, but have fallen into disrepair and are now awaiting renovation or rebuilding. The architecture was brought out most starkly in the abandoned buildings, for some reason. This used to be the Seville Hotel. It still functioned as a hotel, albeit a bad one, as late as a few years ago. The Miami climate is not kind to buildings that are not occupied and maintained.

As for the Ektar, I liked that too. I did not have the exposure, color, or scanning problems with it that others have reported. In the shot below, taken with the I-61 lens, it pulled a great deal more detail out of both the highlights and the shadows than the same shot taken with a digital camera for insurance. Also, because the exposure on this shot was tricky, I bracketed in three 1-stop increments and all were usable; in fact, they were hard to tell apart. Preliminarily, my feeling is that Ektar and old uncoated Leica lenses might be a good combination. Ektar seems to give you the almost grainless sharpness of slide film, but without the unforgiving latitude that can be a problem with these imprecise old shutters. I will be using this combination more, I think.

In the dawn cloudscape below, the Ektar rendered the colors exactly as I remembered them when taking the shot, without any tweaking of the scanner settings that I've developed for generic negative film (Dimage 5400 scanner; Vuescan software).

Next time, though, I will remember to put the lens cap on before rewinding. Several frames were spoiled by light leaks from the edge of the film that were most likely caused by my forgetting this rule. It's one of those hazards of having a lot of old cameras that I don't use often. I've taken to making up placard stickers for my cameras when I get caught like this, and my Fed now bears one to remind me on this point.

Arguses Resurrected

Imagine that you were an amateur photographer in America about 50 years ago, not terribly well off but doing okay, thank you. A Leica might be too rich for your blood, but you like rangefinders and you want the versatility of interchangeable lenses and good German glass. What might be the contents of your camera bag?

One viable outfit might center around the Argus C44, America's world-class 35mm rangefinder from that period, with a set of lenses. As a backup, or because it was your starter camera and you're still attached to it, you might own an Argus 21 Markfinder, a simple but equally high quality zone-focus camera built on the same chassis, with a fixed (well, actually removable, but not replaceable with anything) 50mm lens. You'd need the argus multi finder to go with the lenses, and an external handheld light meter, and a flash attachment and some other odds and ends. The whole kit would fit comfortably in a handsome leather case and would allow you to deal with most any photographic situation with great results and considerable style.

So this is what I saw in an auction listing not long ago, and although I've never wanted to own an Argus -- I've always assumed that a C3 brick would find its way into my hands someday, as part of a lot with something I really wanted, but it never has -- I decided to take the plunge. This was one of those items where the condition was a total gamble; nothing looked abused, but there was no representation of anything being in working order or having been used in a long time.


In due course the cameras arrived, in a leather case whose odor spoke richly of the diverse life-forms that had hitched a ride with the gear, probably none too happy at being aroused from their decades of peaceful existence in some closet to be transported around the country in cold planes and mail trucks. Not having handled cameras of this type before, I was impressed with their fit and finish, and externally they looked okay. The camera bodies and standard lenses had some minor surface tarnish and pitting,but just enough to give them patina, while the wide and tele lenses shone like new. The cameras are handsomely styled, and the lenses for the C44 are probably the most attractive photographic lenses I have ever seen, with their clean, fluted styling and matching lens hoods.

Functionally, the news was not so good. The shutter on the C44 worked, but was very slow, often hanging open for several seconds on the 1/15 setting. The Markfinder shutter and wind mechanism were fused absolutely immobile. Large areas of rust were on the shutter blades, although these did not seem to be the source of the problem. Diaphragms and focus rings on all of the lenses were either very stiff or stuck. With a little coaxing, however, everything on the lenses started turning. The one bit of good news was that the cameras' rangefinding mechanisms worked smoothly and were in good calibration.

The lenses were all affected by fungus to some degree: just a little on the tele, a moderate amount on the two 50s, and quite extensively on the 35. The 35 was the only one that worried me, because the elements of this lens are quite small and none of their area was fungus-free. I am aware that you can have quite a bit of stuff inside a lens and still get nice images, and this fungus took the form of thin spiderwebby traces, but I still thought I'd better open up the lens and have a look. Unfortunately, it defeated my efforts to reach the elements, and the only thing I accomplished was to completely screw up the focus collimation. Recollimating a slow, wide angle lens for 35mm cameras is not easy because the lens casts such a small, dim, and superficially sharp image onto one's scotch tape groundglass, and it doesn't help when the tripod socket comes off with the film-loading back so you can't use a tripod while collimating; it took hours to get it right, although at least I took the opportunity to clean the helical and make it the smoothest focusing of the lenses. At this point I decided to try out the lens, together with the others, and see how much of a problem the fungus was.

First, though, I had to get the cameras working. One very nice feature of these cameras, which you can see in the photo below, is that the shutter mechanism is not sealed off from the film chamber like on modern cameras; a lot of it is directly accessible to small tools, and certainly easy to flush with Ronsonol, just by opening the back and squirting through the generous holes. I started by coaxing the Markfinder shutter through the cycle by pushing various parts of the shutter mechanism, causing a cascade of particulate crud to fall out of the camera. Then both cameras got a good Ronsonol flush, liberating a lot more crud. Within an hour, both were running smoothly and sounding pretty good.


I wasn't sure what to do about the rusty shutter blades. I found an old camera maintenance book which suggested lightly scribbling on the rusty areas with a normal graphite pencil, which purportedly not only removes the rust but lubricates the blades as well. I tried it on the Markfinder. It made the blades look a little better but didn't seem to change their performance. I decided just to leave the C44 blades alone.


Although the shutters were now sounding good, I know better than to assume that old shutters will continue to work the way they do just after a Ronsonol flush. Such a flush has two effects, one permanent (washing out the crud) and one temporary (lubing the works). You need to wait a few days for the stuff to evaporate and the lube effect to go away to find out if they're really working. In this case, the treatment actually did work, and after three or four days, the shutters stablized within half a stop of their nominal speeds; a little fast on the slow speeds, a little slow on the fast ones. The Markfinder shutter, which had completely seized, actually ended up slightly the better of the two.

After testing the shutters I did something that I am doing with more of my classic cameras; I made up decals to place over the existing shutter speed dials which denote the true shutter speeds achieved at each setting. In this case I laser printed the new markings onto a decal that I had colored with silver Sharpie, giving a black-on-silver effect that on casual inspection could pass for an original dial.

The Argus multi-finder that came with the C44, like many of its ilk, was fogged to the point of opacity. It took a while to figure out how to get into it, but ultimately I was able to remove and clean most of the elements. There are enough that I couldn't reach that the unit is still foggy, though now usable. For actual shooting I decided to use a Leitz Imarect.


With the gear apparently working, there was one further cosmetic issue to address. When I first removed the Markfinder from its case, the rear three body covering panels came off neatly with the case. I could have reattached them, but they were pretty nasty. I elected to recover the camera. This was my first recovering job and to get new leatherette, I headed to the local shopping mall and to the handbag section of a discount clothing store. There were many economical sources of pseudo-leather there in assorted fashion colors; many in black, but I wanted something different. After momentarily considering a restrained metallic silver leatherette, I selected a tasteful purple handbag for under $10 that yielded enough material to cover at least 4 or 5 cameras. (I should perhaps have taken a moment to consider whether I would ever want to do more than one camera in this color.) In recovering the camera I made a poor choice of adhesive and there are bumps in the covering here and there where it would not smooth out, but for a first effort it looks okay.


Okay, time to go shooting. I found both cameras enjoyable to handle. They don't feel as well made as a Leica, a Zeiss-Ikon, or even a Fed of the same vintage, but as least as nice as an Agfa Karat. There are websites out there that complain about the process of changing lenses on the C44, but it really is not difficult and I never had any problems getting them to connect properly. Certainly nothing compared to, for example, the terrifying process of mounting a Jupiter-12 on a Kiev.

I did have two minor issues with using the C44. One is, especially with stiff lenses, focusing using the wheel around the rangefinder window doesn't provide enough torque to move the lenses smoothly. I'm more comfortable focusing by grasping the large ring around the lens mount from below, but this is smooth and hard to grip firmly. I solved this by removing the rubber focusing grip from a junker lens of just the right diameter -- I think it was a Minolta Celtic 35/2.8 -- and fitting it around the lens mount ring. Now it's much easier to focus the camera in the traditional SLR or Leica manner. The other issue is that the C44's frame counter dial is located right next to the film wind knob, and the counter dial is easy to turn by mistake when advancing the film. So far I have screwed up the frame counter on every roll I've shot with the C44, and had to guess what frame I'm on when I realized what I'd done.

I tested the camera around New York and on a business trip to Lakeville, Massachusetts. I was impressed with the performance of the fungus-infected lenses, especially the 35mm. In the fourth shot below, when the neg is viewed through a loupe, every twig in the picture is well defined. I may still look for a replacement for this lens, but not with any urgency.

I'm not sure what role these two Arguses will play in my future shooting. It's always satisfying to bring cameras back from the dead, but these cameras are quirky and a bit cantankerous. On the other hand, the multiple lenses confer a good deal of versatility in a more compact package than an SLR setup, and the shutter speeds are consistent enough that I wouldn't hesitate to shoot slides. I can easily imagine situations like a walk through the woods on a fall day where it would be very pleasant to put this gear to use. So these elderly cameras may have quite a few years of image making ahead of them still.

Thursday, November 26, 2009

On Not Quite Seeing, but Close Enough

Pretty close to 90% of taking satisfying pictures is seeing the picture that you want among the chaos and clutter in which the visual world presents itself. Every photographer has days when seeing is easy, when good images just jump out of scenes he has seen hundreds of times before. I suppose that good photographers have a lot of those days. For most of us, on most days, it's not that easy. You can look where you know there's got to be a good picture and not find anything.

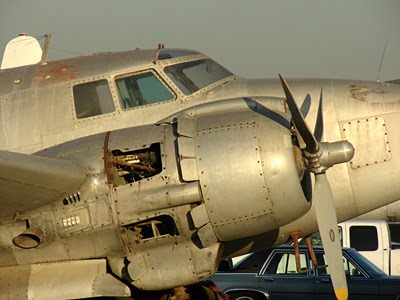
Then there are the days in between. On a recent visit to an airport in southern California I ran across this plane. It's a Lockheed PV-2, a reliable but not very famous US Navy patrol bomber from World War II. This one doesn't look like much now, but it's at the beginning of a long restoration by an owner famous for top-quality restorations, so in several years it should be quite a showpiece. What fascinated me about the aircraft was the way the late afternoon light brought out the patina in its metal surfaces.

But where was the picture? With other aircraft, cars, and clutter all round, it was not easy to find. I tried to clear my mind ("let the force guide you"; "be the ball"; whatever) as I walked around it looking for the angle, the composition I wanted. I didn't quite get there. But I did sense that the front of the engine nacelle and the cockpit area were of the most interest to me, and I felt that I would want a telephoto perspective to focus attention on the surfaces rather than the 3-dimensional forms. I took this shot, which I knew I didn't like, but which I hoped might contain something I liked somewhere.

When I got home, I took another hard look at it. Obviously those cars at lower right would have to go. At length I realized that I could remove them, isolate attention on the bits of the image that I really wanted, and also solve the distracting diagonal aspect of the plane's posture by rotating it 11 degrees to the right and cropping carefully. Had I been seeing better that day, I would have twisted my camera and made that picture on the spot. Luckily I had composed widely enough to give me room for the rotation. This gave me the composition that I wanted, with the things I wanted to be in the frame present, and nothing looking artificially cut off.

All that remained was to bring out the patina with a slight increase in saturation, and address California's air pollution issues by tinting the sky slightly blue. I'm not saying that the result is a great picture, but it was what I wanted out of this situation, and satisfied me enough to justify my walk around the airport. And it was almost -- but not quite -- seen at the time.

Thursday, November 5, 2009

What Can Airplane Photographers Learn from Robert Capa?

This is the first in an occasional series in which I introduce a famous non-aviation photographer and discuss what contribution his or her body of work can make to our shooting of airplanes.

Robert Capa (1913-54) is the most legendary of war photographers. Born in Hungary and originally named Endre Ernő Friedmann, he photographed five different wars from 1936 more or less continuously until he himself was killed by a land mine while covering the French campaign in Indo-China. Capa has so many things to teach us that I had difficulty picking just three.

Capa is famous for saying, "If your photographs aren't good enough, you're not close enough." Capa lived by this motto, coming ashore on Omaha Beach with the second wave of infantry during the D-Day landings and getting amazing pictures that could have been achieved no other way. He not only lived by that principle but also died by it, with camera in hand.

I am reminded of Capa's motto when I see legions of people at airshows pointing their long lenses at the airplanes flying by. About 99% of their pictures are an attempt (not usually acknowledged as such) to imitate air-to-air photos taken from a camera plane, and inevitably they are not as good. Even with the best lenses and image stabilization, they have less detail and the characteristic long-telephoto compression of perspective as compared to air-to-air shots. Only a very few of the best ground-to-air airshow photos are as good as even mediocre air-to-air, basically because the photographers aren't close enough. It makes me wonder whether, rather than investing in expensive equipment and specialized skills to get these inferior pictures, we would be better off either investing in the access and relationships necessary to get a seat in a camera plane for better (closer) shots, or else concentrating on other types of photos that we can do well with such access as we have.


Capa's most famous single photograph was made early in his career during the Spanish Civil War, and depicts a Loyalist militiaman at the moment of being killed by a sniper a few feet away from Capa. Besides the striking nature of the photo, it has also become famous because of the controversy over whether it is real or staged, a question that still has impassioned advocates on both sides. This in turn has sparked discussion of the broader question of whether it matters whether the photo was real or staged.

The real vs. fake debate has come into greater prominence in the digital era. The stakes are greatest, obviously, in the photojournalism area. This would encompass Capa's war photography, but what happens when a photo goes beyond reportage and is "repurposed" as a work of art, or a political symbol? Opinions differ as to whether, and how much, its original authenticity as journalism still matters.

Most in the art-photography community understand that every photo is a creative and selective product, no matter what it pretends to be, and regard any type of manipulation for expressive purposes as fair game. The audience for aviation photography is more conservative. In my experience they don't like a lot of retouching or fakery. They perceive aviation photography as quasi-journalistic in nature, and are more interested in "truthful" depictions of the planes than in the photos as aesthetic objects.


The photo above is an angle that I've always wanted to get of a Spitfire in flight but, recalling Capa's maxim, could never get close enough. In Canada recently I found a full-size replica Spitfire mounted on a pylon, and walked around it shooting photos with fakery in mind. After some Photoshop work, though it is no masterpiece, the picture does what I wanted in revealing the subtle shape of a Spitfire's fuselage in dramatic lighting with a suggestion of flight and movement. I would expect most aviation buffs on seeing the photo initially to be excited at a shot of a Spitfire in unfamiliar markings (serious buffs know how each of the approximately 50 real flying Spitfires is painted), then to find a few telltale clues that it is not a real plane, and come to regard the picture as uninteresting, if not dishonest.

One final lesson from Capa's life. Capa's photos from the Normandy Landings on Omaha Beach in 1944, where he came ashore with the second assault wave, are legendary. Part of the legend concerns the fact that only about 10 of them, including the one at the top of this thread, survived to be published. The rest of the approximately 100 that he took on the beach were destroyed in a darkroom processing mishap back in London, while Capa was still out shooting. How would you feel about taking the same risks as the soldiers that stormed the beaches of Normandy, armed only with a camera, only to have almost everything that you did it for ruined by a lab assistant? But Capa never expressed any bitterness over the loss of the images. Most photographers will tell you that their most treasured images are those yet to be taken.